Showing posts with label ATC. Show all posts

Thursday, June 25, 2015

Day Twenty-Five – Tiny Dancers

According to Kandinsky, "Blue is the colour of spirituality: the darker the blue, the more it awakens human desire for the eternal."

I created another zen chalk mandela drawing in the morning to add to yesterday's seven. Then went through some stamps I've been wanting to use but didn't have time for. I settled on a pair of ballet dancers, an architectural feature and a postal. Then for paper, I chose some shimmer cardstock in eggshell and coral, and some flecked vellum. The dancers were stamped with a blend of distress ink pads in chipped sapphire, dusty concord and tumbled glass. I also spritzed with water on some. Then I stamped the building on old book papers. I wasn't happy with it not showing up well on the black type so got some stencils out and applied some contrasting colors with iced spruce, peeled paint and wild honey. I also misted with some water to soften and dabbed some white picket stain. I'm not sure if I'll use the vellum but at least the images stamped with distress ink did dry as some vellum does not take ink well. Eventually these will be used for ATCs.

Chalk Mandela

Friday, June 19, 2015

Day Nineteen – Loose Ends

Today I just finished up my extra red, white and blue ATCs from last Saturday's trade. I will have them available for trade at the next Rubber Stamp Convention in July at Carson, CA. They were mostly complete from working on them during the meeting. They just needed some final embellishments. I added some tiny star brads after breaking the ends off. I wish I had thought of using them for the last ones already traded.

Saturday, June 13, 2015

Day Thirteen – Fair Trade

I completed 15 artist trading cards for my Long Beach ATC group that meets at Lyons Art Supply downtown. I took the remaining card parts and worked on a few more for future trades at the meeting. Lunch, lively conversation and trading cards with eleven other artists makes it a little distracting for getting too much done so I just take enough to keep busy. We also walked to a nearby recycle store, LB Depot for Creative ReUse, where I picked up a few things including what looked like accordion folded drapery samples that I can see using for binding pages in for handmade books and journals.

The theme this month was "red, white and blue." Pictured above is a summary of the steps from Days Ten, Eleven and Twelve to make the cards and a closer view of three finished cards.


Here are all 15 card variations created. I used Tim Holtz Seasonal paper to cut out tiny embellishments and Sakura gel pens to add accents here and there. The cards were met with some nice comments from the group. I came home with a really nice collection of traded cards which almost everyone stuck to the theme.


Friday, June 12, 2015

Day Twelve – Red, White, Blue

I spent most of today finishing 15 artist trading cards for Saturday's meeting which should be enough. I will have 5 to work on at the meeting to have a few leftover for the Carson Rubber Stamp Convention ATC trade in July.

Shown here are my collage sheets printed from my original hand stamped and colored images. I adhered them to cream cardstock with Golden matte medium then roughly separated them. Then each was cut out with more detail. 

Here's another shot of the assembly line adding washi, fabric and lace tape. I used distress ink and blender to age the trims a bit. With some family feedback, I decided to place the star and lace trims horizontally behind the main images instead of vertically. Bubble wrap scraps were adhered to backs to add some dimension. 

They always take longer than I estimate when having to do several at a time. I will post a photo of the finished variations tomorrow

Thursday, June 11, 2015

Day Eleven – Seeing Stars

Continuing with working on my June artist trading cards for Saturday, I cut out the patterned and layered tissue papers from yesterday. I chose a kraft brown cardstock for the backing. It's easy using Sizzix die #656332 for cutting several cards with rounded corners.

Then I tore the cut out cards with the two different patterned papers roughly on a diagonal to be combined, gluing them to the cardstock with Golden matte medium.

Next I began trying out some ideas with stencils, distress ink and some fabric and washi tape. I had previously stamped a vintage image of children with a flag for a July 4th holiday theme of red, white and blue. Then I hand colored three image variations, scanned and re-sized in Photoshop to fit ATC size better. Finally, I printed a couple of sheets in color. I'm liking the way the elements are coming together. Tomorrow I'll finish assembling which is the fun part.

Wednesday, June 10, 2015

Day Ten – Tissue Transparency

I'm finally getting back today to actually doing something creative, although it was a struggle. Finishing my die organization took a lot more time than I thought and still is not complete. But at least they are all put away. I was able to start my June ATCs for this Saturday's trade. It seemed to take most of my time to gather the different materials I wanted to use, especially choose the paper patterns for the background. I chose a yellowed grunge and tiled pattern to work with.

Then I decided to try layering Tim Holtz Melange tissue wrap. This is really strong paper and a little more opaque than I wanted, unlike gift wrap tissue. So I experimented to see if I could get it more translucent by using Golden gloss medium to adhere to my patterned paper. I also applied a light layer on top. This seemed to work pretty well but still the tissue design was a little dark so I tried sanding some to distress. This paper is really tough and took more effort than I expected! But I am happy with the result so far. The problem is however, the gloss medium will now act as a resist for distress inks so if I want to add any color, it will have to be acrylic paint instead. The sanding may have removed some so we will see.

Tomorrow I will continue with cutting out the cards and assembling. I don't have a clear idea yet so will play around as I go. 

Sunday, April 5, 2015

Happy Easter ATCs

Artist Trading Cards made from various die cut shapes, embellished with gel pens. The bunny topiary was covered with embossing ink, then dipped in beach sand and green enamel embossing powder and heated. Then repeated with just powder and highlighted with distress paint. Trimmed toothpick was stained with distress ink and glued to back. 

Happy Easter ATCs

Monday, September 16, 2013

Metropolis ATCs

My ATC group's theme for September was Movies. I made 10 cards, each different this month choosing my fav 2 Sci-Fi movies starring robots. Here are my 5 from Metropolis. It was a lot more fun doing each different. What the camera didn't pick up is the added collage gears are very shiny metallic cardstock. For some of the Marias I did a clear tape transfer with metallic foil paper on the back. They ended up looking like foil stickers.

Forbidden Planet ATCs

This month my ATC group's theme was Movies. So I chose my 2 fav Sci-Fi flicks featuring robots. I also decided this month to only make 10 and each one different instead of all the same. Here are the 5 I did for Forbidden Planet with actual quotes from the movie.

Sunday, September 1, 2013

Mermaid ATC

Mermaid ATC
I recently joined an Artists Trading Card group and this is the first one I made for the swap for August 2013. These are 2.5 x 3.5 inch artist trading cards that you make several of and trade with other artists so then you have a collection. I made 25 which was way too many for this group but I'll have some left to trade another time or with other groups. I also found out that I didn't have to make them all the same but it's ok to. The theme was "beach." Without getting to technical, I used some recycled materials such as Pendaflex file folders that were being trashed at the office, aluminum soda cans both die cut to card and tag shapes. Rubber stamps, ink, embossing powder, markers and gel pens were used for images. The recycled metal die cut tag frames inset with mermaid collage elements were finished off with Glossy Accents by Ranger. Pearl Paint beads completed the string o'pearls.

Sunday, April 15, 2012

House To Die For

House To Die For
Fun with Sizzix dies and a Vagabond.
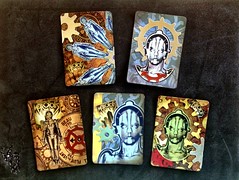
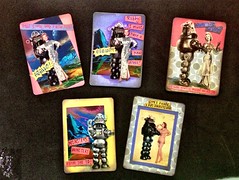
This started as a test run to create a set of cards inspired by the decks I had as a kid, that were designed by famed California designer 
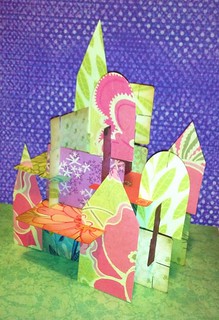
Charles Eames. I used an ATC die to cut the shapes out of double-sided patterned cardstock, then hand cut identical slots on the ends of each card. As an after thought, as long as I had the Vag out, I cut some more shapes using the Artful Dwellings die from leftover paper as I hadn't tried it yet. I started putting the cards together to form a structure to see if my slot measurements would work. Losing myself in the fun of it, I had built a new modern "house of cards" complete with arch and steeple shapes before I knew it.

As a child, these two card sets, one large and one small, were probably the single most influential creative "toys" I played with. They imprinted my young brain with patterns, colors and aesthetics that have contributed to forming career and design choices all my life. I have my Mom to thank for that due to her interest in Eames and selecting these for my playthings, young and uncoordinated as I was.

My memories of them were recently refreshed when Mom and I went to the California Design, 1930–1965: "Living in a Modern Way" show at LACMA. Our main purpose that day was to see In Wonderland: The Surrealist Adventures of Women Artists in Mexico and the United States, where works by Frida Kahlo and others were on display. The CA show was a real bonus featuring furniture and textiles by Charles and Ray Eames and other iconic designers as well as interiors, graphic design, housewares, appliances, Barbie & Ken with the first Dream House and even a full size Airstream trailer! Alas, the gift shop was sold out of the medium sized reproduction set of cards but they can still be ordered online from LACMA or Eames Gallery.

The gears in my brain have been whirring ever since though about making my own custom set. The possibilities are many... think of a custom set of photos for a family member separated by distance, a set with images and words of encouragement, an artist's portfolio, limited edition sets. The proportions of the ATC shape may be slightly different but worked well. While I can't publish the exact measurements of the slot locations due to possible copyright infringement, it's easy enough to Google images of the cards and figure out something similar.